Our objective: Comparing detection results from our MDR system with Microsoft365 Defender. And since the environments we typically work in are hybrid IT environments, consisting of both cloud and on-premise infrastructure, we wanted to make sure to include on-premise Windows machines in our testing process.
Therefore we had to implement a setup that would allow shipping on-premise Windows logs to multiple detection systems.
Sending logs to two separate detection systems from a single on-prem Windows host
If you read our previous article on Logstash syntax checking you probably noticed that we love (to fight with ? ) Logstash. We use it for all of our log sources in our anomaly detection solution. When it comes to Windows logs, data is processed as follows:
- We ship Windows logs to Logstash using Winlogbeat
- Logstash ships these logs to Kafka and Elasticsearch
- Logs are used in our MDR system for … well, anomaly detection
Step-1: On-prem Windows host onboarded to M365 Defender
For M365 Defender for Endpoint to be able to do its job, the on-premise Windows host needs to be on-boarded. There are multiple ways to do this, but the simplest option (recommended for up to 10 devices) is to download a predefined Powershell script (which can be found here), run it on the on-prem Windows host and to simply wait for it to pop up in the M365 Defender portal.
Step-2: Winlogbeat configured for on-prem Windows host
The setup of the Winlogbeat agent is well documented here. The following bullet points provide a brief overview of the key steps:
- Download the Winlogbeat zip file from the downloads page.
- Extract the contents into C:\Program Files.
- Rename the Winlogbeat-<version> directory to Winlogbeat.
- Open a PowerShell prompt as an administrator (right-click on the PowerShell icon and select Run As Administrator).
- From the PowerShell prompt, run the following commands to install the service.
PS C:\Users\Administrator> cd 'C:\Program Files\winlogbeat'
PS C:\Program Files\Winlogbeat> .\install-service-winlogbeat.ps1

Security warning
Run only scripts that you trust. While scripts from the internet can be useful,
this script can potentially harm your computer. If you trust this script, use
the Unblock-File cmdlet to allow the script to run without this warning message.
Do you want to run C:\Program Files\Winlogbeat\install-service-winlogbeat.ps1?
[D] Do not run  [R] Run once  [S] Suspend  [?] Help (default is "D"): R

Status   Name               DisplayName
------   ----               -----------
Stopped  winlogbeat         winlogbeat
Result: Ability to run scripted attacks and objectively compare
We then ran our scripted attacks (based on Mitre Att&ck Techniques) and were able to objectively compare detection results. Below you’ll find a selection of the scripted attack techniques that we ran as part of our testing work (we haven’t listed them all ?):
| Scripted Attack | Mitre Att&ck Techique ID |
|---|---|
| Brute Force | T1110 |
| Browser Extension | T1176 |
| Bash History | T1552.003 |
| Account Discovery | T1087 |
| Access Token Manipulation | T1134 |
| System Information Discovery | T1082 |
| Ingres Tool Transfer | T1105 |
| Command Line Interface | T1059 |
| Password Spraying | T1110.003 |
| Account Access Removal | T1531 |
| Valid Accounts | T1078 |
| Network Service Scanning | T1046 |
| Active Scanning | T1595 |
What were we aiming to achieve in our testing work? We wanted to see if our non-intrusive anomaly detection solution could meet the Windows-specific detection capabilities of Microsoft365 Defender for Endpoint. Naturally, a vendor-specific endpoint protection system has access to more granular, low-level data. So we wanted to see if our detection solution could detect as well as Microsoft365 Defender, while only having access to standard Windows event logs.
Comparing three separate detection systems, both on-prem and cloud
As we really got our teeth into the testing process, we decided to take it yet another step further. Not only did we want to compare our on-premise MDR system with Microsoft365 Defender, we also wanted to compare against our own cloud-hosted system. When we did that we encountered the challenge of having to ship exactly the same logs from a single on-prem Windows host to two separate detection systems: One of these on-premise, the other hosted in GCP (Google Cloud Platform).
Challenge: Two Winlogbeat instances on a single on-prem host?
What sounded like a rather mundane, trivial task, ended up being a small challenge, because we had to configure multiple Winlogbeat instances on a single on-premise Windows host.
Result: Two Winlogbeat instances and two Logstash receivers
While trying to configure Winlogbeat to send logs both to the on-premise Logstash as well as over the public Internet to a Logstash instance running in GCP (Google Cloud Platform), we realised that we would have to set up two separate Winlogbeat instances on the same on-prem host:
- Winlog_1 –> Plain text (unencrypted) to Logstash via the local network
- Winlog-2 –> Via TLS over the public Internet to a Logstash instance in GCP
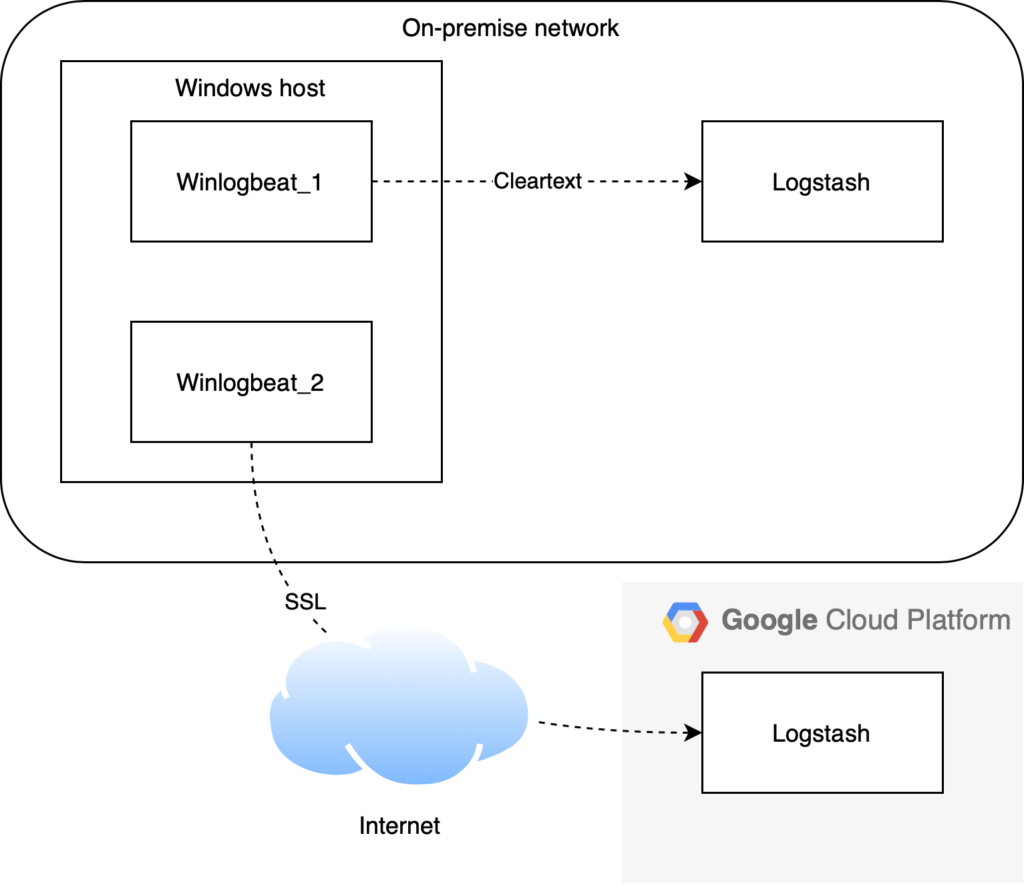
Below we have outlined how two Winlogbeat agents can be set up on the same on-premise host.
Setup of Winlogbeat_1 (winlogbeat)
We have already outlined the standard setup of a Winlogbeat agent on an on-premise Windows host above. It is also well documented here.
Setup of Winlogbeat_2 (winlogbeat-gcp-ssl)
Once Winlogbeat_1 has been successfully configured, while remaining in the install directory, i.e. C:\Program Files\Winlogbeat, do the following:
- Copy winlogbeat.yml and give it a different name, i.e. winlogbeat-gcp-ssl.yml
- Edit as per your requirements: Output address, SSL, etc. (part of the config with respect to Logstash output below). Pay attention to the use of single quotes; if using double quotes escaping will be necessary!
.....
#----------------------------- Logstash output --------------------------------
output.logstash:
  # The Logstash hosts
  hosts: ["xxx.xxx.xxx.xxx:5044"]

  # Optional SSL. By default it is switched off.
  # List of root certificates for HTTPS server verifications
  ssl.certificate_authorities: 'C:\Program Files\Winlogbeat\org_ca.crt'

  # Certificate for SSL client authentication
  ssl.certificate: 'C:\Program Files\Winlogbeat\client_combined.crt'

  # Client Certificate Key
  ssl.key: 'C:\Program Files\Winlogbeat\client.key'
  ......
- Copy install-service-winlogbeat.ps1 to install-service-winlogbeat-gcp-ssl.ps1
- Edit newly copied file. Pay attention to edit all mentions of Winlogbeat to reflect the name chosen for Winlogbeat_2!
 # Delete and stop the service if it already exists.
if (Get-Service winlogbeat-gcp-ssl -ErrorAction SilentlyContinue) {
  $service = Get-WmiObject -Class Win32_Service -Filter "name='winlogbeat-gcp-ssl'"
  $service.StopService()
  Start-Sleep -s 1
  $service.delete()
}

$workdir = Split-Path $MyInvocation.MyCommand.Path

# Create the new service.
New-Service -name winlogbeat-gcp-ssl `
  -displayName Winlogbeat-gcp-ssl `
  -binaryPathName "`"$workdir\winlogbeat.exe`" -environment=windows_service -c `"$workdir\winlogbeat-gcp-ssl.yml`" -path.home `"$workdir`" -path.data `"C:\ProgramData\winlogbeat-gcp-ssl`" -path.logs `"C:\ProgramData\winlogbeat-gcp-ssl\logs`" -E logging.files.redirect_stderr=true"

# Attempt to set the service to delayed start using sc config.
Try {
  Start-Process -FilePath sc.exe -ArgumentList 'config winlogbeat-gcp-ssl start= delayed-auto'
}
Catch { Write-Host -f red "An error occured setting the service to delayed start." }- Save the file and run in elevated Powershell prompt:
PS C:\Users\Administrator> cd 'C:\Program Files\Winlogbeat'
PS C:\Program Files\Winlogbeat> .\install-service-winlogbeat-gcp-ssl.ps1

Security warning
Run only scripts that you trust. While scripts from the internet can be useful,
this script can potentially harm your computer. If you trust this script, use
the Unblock-File cmdlet to allow the script to run without this warning message.
Do you want to run C:\Program Files\Winlogbeat\install-service-winlogbeat.ps1?
[D] Do not run  [R] Run once  [S] Suspend  [?] Help (default is "D"): R

Status   Name                       DisplayName
------   ----                       -----------
Stopped  winlogbeat-gcp-ssl         Winlogbeat-gcp-ssl
- If everything went well, a new service should pop up in Windows services
- Start the service and monitor the C:\ProgramData\winlogbeat-gcp-ssl\logs directory for errors
Shipping M365 Defender events to our anomaly detection system
To add yet another layer to our testing setup, we then decided to setup M365 Defender in a way that would enable our cloud-hosted anomaly detection system to receive events/alerts generated by M365 Defender for Endpoint as an additional source of security-related events with a potentially high informational value. The objective: To use M365 Defender events as an enrichment source in our EAGLE anomaly detection process in order to allow security analysts to answer key questions:
- Do M365 Defender events confirm events detected and highlighted in our vendor-independent, cross-infrastructure EAGLE anomaly detection system?
- Do M365 Defender events indicate possible risks or incidents that were not (yet) observed by our EAGLE platform?
To be able to do that we ended up with the setup where the M365 Defender streaming API is configured to send alerts and additional info to the Azure Event Hub. We then connected the Event Hub to our EAGLE anomaly detection system hosted in GCP.
Comparing detection results with Microsoft365 Defender using a hybrid test setup
So we managed to setup this hybrid testing environment to be able to compare multiple detection systems while running scripted attacks on a single on-premise Windows host. Ultimately we ended up with the setup summarized in the following diagram:
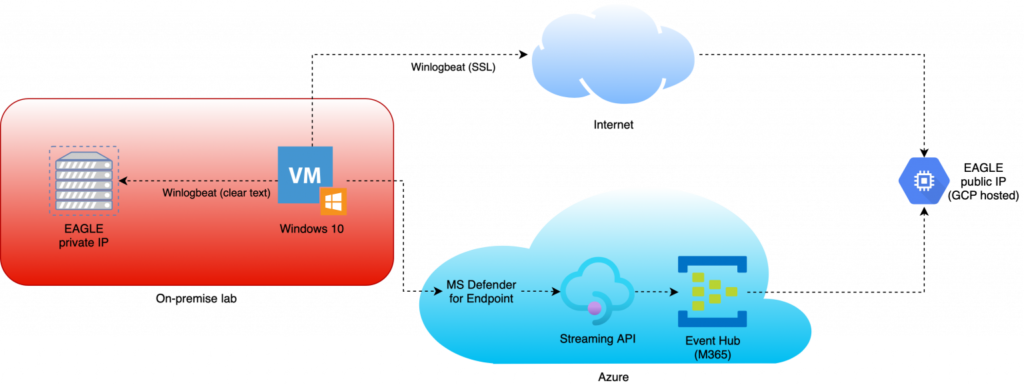
NOTE: For the sake of clarity, only one Windows host is shown in the diagram while testing was done in an environment where multiple windows hosts were running.
The simplified diagram above shows:
- An on-prem Windows 10 host sends log data to both the on-prem and cloud-hosted EAGLE instances using Winlogbeat for log shipping
- The same on-prem Windows 10 host is onboarded to Microsoft Defender for Endpoint and the Streaming API is used to forward events to the Azure Event Hub
- The EAGLE instance running in GCP (Google Cloud) receives data from Microsoft Defender for Endpoint
Value of our testing setup
The value of the above setup is having an environment that enables:
- Objectively comparing detection results between between multiple attack / anomaly detection systems
- Objectively comparing M365 Defender detection results with our own EAGLE system
- An on-premise Windows host to ship logs in the local network as well as to a separate cloud-hosted detection system
- Leveraging M365 Defender events as an enrichment source for our vendor-independent, cross-infrastructure anomaly detection solution
Comparing detection results with Microsoft365 Defender – stay tuned!
Now that we’ve provided some insight on how we set up our hybrid on-prem/cloud testing environment, in an upcoming blogpost we’ll explain:
- The type of scripted attacks that we are running
- How we compare results between the different detection systems
- Our conclusions from the comparison
Would you like to discuss in more depth?
Perhaps you are facing challenges in the design, implementation or operation of your
- Log management;
- SIEM; or
- Anomaly detection
platforms?
If so, contact us for an initial chat to discuss how we could support you regarding your specific requirements.